Thursday, January 30, 2014

Use Your Phone As A Document Camera

    Teachers are always looking for ways to save money. In an astronomy class today, I wanted my students to draw a diagram of Hydrogen Fusion. I discovered that the copies I made for them didn't' come out as I planned. Mostly because I had my weekly conflict with the school copy machine. Anyway, I had a really great diagram illustrating deuterium and tritium fusing to make Helium, but I had no way to show my students. I took the diagram from a textbook, which I only have one copy of, and I couldn't find the same one online to project. And, just like that it hit me...Use Google Hangouts!

  I took out my phone, opened the hangout app, and called my school Google Apps user on my classroom desktop. (I had a really good hangout with myself.) And viola, I had a document camera. Maybe not the best solution all the time, but was a great save for the drawing, and was a great way to project the color illustration from the text for students to draw. It was not quite the same resolution and quality as a professional document camera, but with some tweaks it could be just as good, if it is a tool you use some of the time.

   So here is what I did, in more detail.
  1. I logged into Google hangouts on my android, to my personal Google account.
  2. I called my Google Apps For Education User on the desktop computer in the classroom, via Google Hangouts
  3. Being in a science room it was easy to find a tripod, I used a ring stand with a wire ring support, to prop my phone at the appropriate distance from the image. 
  4. The other end of the hangout was running through the classroom projector onto the SmartBoard
  5. Just like that,  students were able to see that illustration with ease. 
Sometimes it helps to have watched McGyver as a kid. 

Opensource OS For Education

      For some of you, Tux, over there is the lovable Linux mascot, for others it might be a new face. So why is he there? He's there, and there without citation, because he is a lovely face for opensource, and a great mascot for Linux in education.

      School budgets are tight, the push for more technology use with students is in high demand, and these tools aren't cheap. How can we make them more affordable?
     Why not use opensource operating systems like Linux?

There are a variety of distributions, or distros that market themselves as educational packages. Meaning that the operating system comes fully loaded with a variety of tools useful in education, and are marketed as free. It is good practice to leave a donation for the team who puts in the effort to make these tools, but it's like the tip cup at an ice cream shop. You could place your order, and shift your glance from the tip cup to the college kid working, and back to the tip cup, take your ice cream and leave. Or you could throw your change in there as a thanks for serving me. The moral and ethical debate about a donation can be discussed later.

      The point is, these opensource operating systems have the potential to curve that large technology budget, to leave room for other tools. With many educational tools available online, it doesn't seem like it is worth the money to buy a huge clunky OS like Windows, to get a bunch of tools the students might use once, and then flood it with malware, viruses, spyware, trojans, worms and all kinds of bad stuff that renders the OS useless, until the technology person can re-image the thing. Students could use a snappy OS to access the tools they need, with very little security issues like all those listed above.

     I have worked closely with the Technology Director at my school to take machines that were destined for the land fill, clean them up, install Linux, and doubled the size of the computer lab for the Science Department. The only cost might be the extra electricity usage for adding 10 more work spaces for students, to allow 20 students to work on a machine. On average, that only leaves about 2-4 students without a work-space, compared to the 12-14 students without a work-space. I think that's a pretty good turn around, and allows me to better integrate technology tools into my curriculum.

    If you are not so sure about diving in just yet, dig out an old laptop, or desktop, download a Linux distro, install it and start exploring. In no time, you'll fall in love and see how easy it could be to use this in education, and safe a lot of money.

Monday, January 27, 2014

Appointment Slots In Google Calendar

    Some people may have noticed that the Appointment Slots option in Google Calendar has been retired for the regular user. However, it still exists for the Google Apps for Education, and Business Domain. The Google Gooru made this really nice tutorial on how to use the option.

   The option works really well within education when students have to sign up for presentations, or schedule meetings with teachers and other faculty members. Teachers could very easily use this function for parents to sign up for conferences, or in the building for signing out things like laptop carts, certain room spaces, or even sign up for after school activity duties.


Photo Storage For Students and Teachers

    Teachers and students are using more original digital photos and need easy access to those photos to share, and reuse for various educational needs. Students have access to devices like androids, iPhone, and iPad, and teachers have access to the same tools. Teachers love to take photos and share them with parents, as a glimpse into the daily magic. Students enjoy using photos for various projects. So, what tool is best for students to store, access, use, reuse, and share their original work in education?

   My first choice would be Google Plus.   I know that not all schools and students have access to Google Plus, so a very close second would be Instagram. For students to be able to use either of these tools, they need be at least 13 years old. Both tools allow for your device to sync and upload images automatically. Both tools allow for the user to remain the owner of their original work. While Instagram allows you to add hashtags to photos as they upload, to help keep you organized, Google Plus Plus allows to create albums. Both tools allow for access to these photos from most devices that have an internet access. I say most devices, because Instagram only allows you to upload photos from a device that supports apps, like smartphones, and tablets. However, you can view, comment, and share photos from a computer.

   I prefer Google Plus over Instagram, only because it allows you to upload photos from any device, offers some simple photo editing options, allows the user to share the photo, and custom albums, it is easily accessible from a variety of devices, and integrates well with many other online tools.

Friday, January 24, 2014

Google Sites, Detailed Guide

     I came across a great resource today, posted in my PLN (personal learning network). The author is Eric Curtis, a Google apps certified trainer and teacher. He put together a detailed guide for using Google Sites in Education. Take some time and read through this document, and keep it handy while using the tool. It is a great reference for the general use of the tool, and help address some of those unpredictable issues that arise.

https://docs.google.com/document/d/1SrDYq7eua_bd4rTF6YRjg1mQTm3x8KYqVkzLPwsnxzI/edit


Thursday, January 23, 2014

Google Image Search Tools

Students love pulling images from Google Image searches, and often times forget to provide the appropriate citation. If they use an image without the appropriate rights, there could potentially be some backlash. With the help of some of the built in search tools, students can filter a Google image search to provide images that they might have rights to use. Here is how to use these tools.


  1. Go to google, search for you topic, and click images


  2. Click Search Tools, then click Usage Rights. 


  3. Select the option for "labeled for reuse"


Along with the simple license filter there are other options for sorting by color, size, image type, and time. All options that may have value for students, depending on the particular assignment.

Digital Portfolios

     Many teachers are making a transition to the new buzz word of standards based grading. Some teachers have always been there and modified their grading to fit into whatever grading system is required by the school. Any way teachers grade, portfolios of student work are a great way for students to prove and demonstrate their understanding and learning of any topic. Traditionally, students would be asked to pull specific pieces of work and organize it into a binder or folder, where the teacher could sift through and see the compilation of work over the course of weeks, months, or the school year. The same idea still exists, but it is much easier to compile these pieces of work, and create something the student can easily "take" with him or her and use as evidence of learning.


     To stick with the buzz words, ePortfolios are the 21st century learning initiatives take on student portfolios. The idea is for the student to create a unique and original digital piece of work that demonstrates the student's growth, and mastery of the content. There are a variety of forms of an ePortfolio, but the final product is still the same. A compilation of student work. People learn best when they are given the opportunity to try a task, then reflect on the experience. ePortfolios do exactly that. It provides an opportunity for students to do their best at any given assignment, and then reflect of the process.

But why ePortfolios?

    The benefits to ePorfolio's allow the students to have a certain realm of freedom, creativity, vision, and ownership. The traditional portfolio is rigid, and bound to a single vision of the teacher. The ePortfolio has the potential to provide the student with the freedom to use a variety of tools and express his or her knowledge, or mastery of the content in the best way that makes sense for him or her. Similarly, it provides a way for the student to reflect on his or her learning, through the vice that allows for the most comfort with expression. When learners are comfortable in a learning environment they are able to make great advances, especially when they are comfortable and confident with the way they need to prove their understanding and reflect on growth. These unique creations also have the potential to be an artifact that the student can take anywhere they go. Especially if it is built using free opensource tools. Tools like Google Sites, Silk, Dropr, or even PortfolioGen.

     The student can create a portfolio, and be able to access it wherever there is internet access. The student will also have the ability to limit and control the range of their audience and have the ability to pull that ePortfolio for appropriate college or job applications.

Activity option in Google Drive

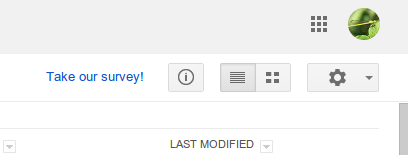
Many Google Drive users have discovered that the Activity option has become more accessible. Here is how it can help you with your students.


If you haven't seen the option yet when you log into your Google Drive there is an icon over to the right with an "i"  that opens the activity window and details.
Click on this button.


This provides updated information about changes to documents, items created or shared with you and in general alerts you to any changes made that pertain to you.


So, how can this be useful with your students? 
Often times students might not share documents with you the exact way you want them too. It can often be tedious to sift through the entire "shared folder" to find the one document that a student shared. The activity window helps you sift through recent changes much easier. It allows you to quickly find recent changes and find those documents shared by students very quickly. Lets face it, as a teacher anything to save time is a bonus. 


Thursday, January 16, 2014

Paperless Classroom


This is an image of Albert Einsteins desk. As a fellow science geek, and science teacher, my desk wasn't too much different than that. However, through adopting a paperless classroom, my desk now looks like this.


    The changes I made were to really adopt the use of Google Drive, and other Web 2.0 tools. My school is not lucky enough to offer a 1:1 program, where each student is provided a piece of technology by the school to use throughout their student career in the district. However, my school does have a rather large computer lab that is often unused, and we have Google Apps For Education

     So, I decided to be that teacher and sign out the computer lab, just about every day. Most of the day-to-day work is completed with assignments posted in Edmodo, or Google + and completed using various tools. For example I have posted directions on Google + for students to read an article about the Birth of a new Island, then create a Prezi that describes the underlying forces at play in this area to cause the phenomena, making the lesson more dynamic and interactive than the traditional paper poster.  On the other hand, some science labs and place-based education labs still require appropriate field tools, data sheets, and field notebooks. However, for those students who have access to individual devices like iPhones, Androids, iPads, or iPods, are allowed and encouraged to use the appropriate apps to collect data. These apps could be tools used to capture digital photos, record audio, record video, or even apps to measure seismic activity.

    This change in the classroom, presents much more organized and timely work. Students are typing most of their work, which alleviates deciphering handwritten work. Using these tools requires that the students "share" their work with the teacher. This allows the teacher to be able to monitor progress, and eliminates the old excuse of  "The dog ate my homework." Similarly, Google Drive can be organized just like a class binder. With appropriate guidance students can make appropriate folders to store and create work. It is also easier for students to compile ePortfolios for their final exams. For me, it is an easy way to bring grading anywhere that has internet. I can grade work on my Android while in the waiting room of the doctor's office, or comfortably grade while watching TV without fumbling through piles of paper. 
     Book the computer lab and try making the shift to a paperless classroom. 

Google Sites tip for Digital Portfolio's

I prefer to use digital portfolio's as my final exam's  for my science students. It gives them the opportunity to pull work they are proud of and reflect on their learning process, and demonstrate their working knowledge of the content. I had my students using Google Sites to create their portfolio's and we ran into a few hiccups. Students were attempting to embed work from other tools like Prezi, Thinglink, Chronozoom, sliderocket, and other Google Sites. Previously, Google sites allowed users to simply copy the embed code into the html on the page, but it is no longer working. Here is how we got around that issue.
  1. Open your Google site. 
  2. Edit the page where you want to embed your object. 
  3. Click insert >more gadgets


  1. Depending on what you want to embed search for Iframe gadget or Embed gadget. 
  2. Use the Iframe gadget to embed another website into your site
    1. Copy the URL of the site you want to embed
    2. paste the URL in the first box that appears on the Google Gadget. 

  1. Use the Embed gadget to embed another project created with another online tool. 
    1. Navigate to the project you want to embed. (in this example I used prezi) 
    2. Find the Embed code on your project. 
    3. Copy the code
    4. Navigate back to your Google site and paste the code into the box. 
  2.  Once you code is pasted in the gadget, save your page. 
  3. If you are using Google Chrome, a little shield icon will appear in the address bar. 
  4. click the shield and select "load unsafe script."
  5. Viola...your objects are now embedded. 


Wednesday, January 8, 2014

Goodbye Snow Day...Hello Virtual Day


     Recently my school district has been struck with some significant winter weather, resulting in three consecutive snow days. While all the students and teachers celebrate and enjoy an unplanned day off of fun in the snow. We are soon struck with a hard reminder come the end of the school year, when it's really beautiful outside, and the year is extended.  


     Schools do their best to create a school calendar that allows for some snow-days, but even the Farmers Almanac has a difficult time predicting exactly when a storm will occur and how much snow will fall. Instead of trying to extend a school year, or lose other vacation time, why not use technology to eliminate the snow day all together?

     Virtual tools like Edmodo, Edublogs, Blogger, or Diigo  offer great ways for schools to provide virtual learning activities for students to accomplish at their leisure during the lazy unplanned day off.  The work provided could be generic content related activities that teachers put together at the beginning of a school year and store away for that snowy day. When the notice goes out for snow day, teachers can fire up their virtual setting, launch the activity and interact with students through set "office hours" on those days. This could count as a learning day and help reduce those extended school years.

     Of course this would require some cooperation between parents, schools, and the students to provide the appropriate tools to access the virtual content. However, with the increase in availability of mobile devices and data networks, many students already have appropriate access. There is always the issue of a power outage, but each scenario could be addressed appropriately at the school level.

Let's get rid of the snow day, and call it a Virtual Day!


References:
Hollignsworth, H. (2011) Virtual Snow Days? Schools Experiment With Online Lesson During Bad Weather. Associated Press. Retrieved from http://goo.gl/YOm60X

School bus image retrieved from http://goo.gl/fgaozn, 2014

Thursday, January 2, 2014

Supervised Users in Chrome Beta

Google Chrome (Beta) released a great new feature to supervise other chrome users. Once you sign into Google chrome, you have the option to become a manager of other users who might use Chrome on that workstation. This option has potential for educational purposes. A classroom that has computers available for student use, can be set up with a generic chrome user, or Chromebooks that are used in education can be set up to provide better management of user sessions.

Google provides a great How-To tutorial. There are a few nice things about using supervised users in education:
1) You have better control over monitoring which sites students visit.

2) Managed users are defaulted in a "safe" Google search. Which means that most of the inappropriate content is filter out.

3) Managed users provides you with the opportunity, at the classroom level, to easily adjust what internet sites students can access.

Again, this tutorial from Google is a great resource.

As I explored using this setting, I plan to create one supervised user on my local classroom machine for students. This user will have limited access to some internet sites. There is an option to only allow users to navigate to approved sites. In my science classroom I would tailor these machines to be "Science" machines only, for that user. In other words, the would have access to the Google Apps Domain, and select other sites we use frequently. The other tweak I would make is to change the chrome shortcut will to open the supervised profile by default. To set up the shortcut. Follow these steps.

1) Right click the shortcut icon
2) click properties
3) in the Target box add this to the end of the command
--profile-directory="Profile 1"

(this image is from a linux machine, but the same switch works for mac and windows) 

The text in quotes is the profile you want to open. Usually "Default" is the first user's profile, which will probably be yours. Profile 1 would be the second user added, Profile 2 would be the third...and so on. For my own machines my personal account is Default, and the student supervised account is "Profile 1."