Wednesday, December 9, 2015

Sign in, Sign Out on a pseudo-Droid? (Not BB-8)

Most schools have a policy that requires students to sign in and out of a classroom if they request to leave the room during class time or arrive late to class. similarly, most computer labs have a sign in and out book of some kind. 

Recently, my school Tech support person approached me about some very old Asus Netbooks that were really good at collecting dust and keeping papers from bowing away. I was asked if I had any use for them. Being the tech hoarder that I am, I immediately jumped on this opportunity and took as many as I could. Why would anyone want an Asus Eee PC seashell series Netbook you ask? Well, the intel atom process is perfect for running Android. That's right, Android. I grabbed up those paper weights, and put some of students on the task of cleaning them up, and creating one solid tweaked out Netbook. We downloaded a pre-compiled x86 branch of Android from the android-x86 project hosted on Sourceforge. We installed the operating system, and just like that, this paper weight was a newly rooted Android tablet. 

Why would we do this you ask? Well, I was getting annoyed with having to continuously clean up the fake names and doodles on my sign in/sign out book in my classroom. I was also annoyed with the occasional interruption in the middle of class because the pen or pencil was missing from the book. I decided to use this device to house a google form as my classroom log. This has helped to eliminated the fake names, times, and most of the fake reasons for leaving or arriving. I also haven't had to replace the writing implement yet! 

The device is a nice piece of equipment to leave near the door. I don't  really care if anything were to break. Similarly, if a student were to try and take it, the battery won't stay charged for very long, and being a pseudo Android, it only works if you have wifi. The device can't make calls, or use data. Since it is rooted device, I easily password protected all apps. A student wouldn't get very far. Unless they could hack my 5 sentence password. (shoot now they now it's 5 sentences. It still won't matter.) 

Here is my routine with the device:
  1. First I made a Google Form to mimic my sign in sheet. 
  2. I have the form set to require users to log in. 
  3. I also made a fake google user in our domain to remain signed into the form during the day. 
  4. On the android device, I made this form the start page for Chrome. 
  5. In the morning, I unplug the device from the charger, sign in as the "science" user on the form and place it on the desk by the door. 
  6. When a student leaves they sign out. When they return, they sign back in.
  7. The form is also available to all students if they want to use their own device, however they have to log in with their Google Apps account to access the form. 
  8. At the end of the day, I shut off the device and put it on the charger. Typically the machine has been holding a charge throughout the day. The Android spends most of the day in sleep mode anyway. (The Android is also set to wake without a password. Upon waking up, it starts in Chrome) 
Really, any device would work. All I'm doing is accessing a google form. I felt this was a good use of a piece of equipment that was heading for the landfill. It was also fun to turn this thing into an Android. 

Saturday, November 28, 2015

Goobric and Doctopus in Classroom

It has been a while since I posted about technology. I took a well needed break from writing as well as from technology. A little tech detox was refreshing.
Since this is my first post in a while, I'll keep it short and sweet. I've been travelling around teaching teachers about the very basics of Goobric and Doctopus combined with Google Classroom. This is a very, very short introduction. However, it is  enough to get you going.

Enjoy.


Thursday, September 10, 2015

Photo Math App, The Good, The Bad...


I know Photo Math is an older App, but I never really played with it until recently. A friend reminded me of the App and then I became more aware of students using the tool. I noticed some students using it to cram some algebra homework in homeroom. I was curious how accurate the tool might be. Like any other tech-geek, I downloaded the app that night, grabbed one of my sons math worksheets he has to do for homework (don't get me started on that) I snapped a photo and viola...answer revealed. At first I was very impressed and jealous that an App like this didn't exist during Calculus III days back in college. I wondered if it would have been able to solve this problem and produce the graph...

Let C be the oriented closed curve in the first octant consisting of three circular arcs: the portion of (x^2 + y^2 = 1, z = 0) from (1,0,0) to (0,1,0), followed by the portion of (y^2 + z^2 = 1, x = 0) from (0,1,0) to (0,0,1), followed by the portion of (x^2 + z^2 = 1, y = 0) from (0,0,1) to (1,0,0). Let G = [y^2, z^2, x^2]; and compute the integral along C of G.d r, both directly and using Stokes' Theorem.


Fortunately the App can't handle this problem, so let's just say I felt pretty good knowing at one point in time I could do math that this App can't do. Well, back to the point, the App was doing homework for students. I wasn't sure if it was cheating, or if it was a great resourceful way to complete the numerous repetitive problems they needed to do. Sure, they probably weren't learning much, but how often is homework used as an avenue for learning? I would argue that most teachers utilize homework as work to do outside of class for drill and practice, or because the classroom agenda didn't allow for everything to get done, so "just do it for homework."

I started thinking more about this tool. Obviously the math teachers must know about this, I mean Wolfram Alpha does the exact same thing, sort of. You have to manually put in the equation, but it will solve it for you, with steps, graphs, charts...etc. It can solve the problem I used as an example (on a side note; the engine behind Wolfram Alpha was the tool I used back in the day in college to create the 3D graph pictured above. If only I knew enough to take the opensource software and host it on a site for everyone to use, I could be rich. Oh well.) So, why am I so flustered by this App? 

I arrived at two conclusions, one good and one bad. 

The bad one was based off of what I mentioned before. The App does exactly what it sounds like, it accesses your devices camera to scan a math problem and then solves it for you, no thinking involved. Just point, tap, and viola homework done. The tricky thing is, this app most likely won't be allowed on any test and quiz. The way that I have experienced math classes, and the way in which a majority of math classes are still taught, the drill, practice, memorization, and regurgitation is the only way to get through. The app cuts all that out and you are left with only the classroom note taking experience to pass the course. 

The good thing about this app, is spawned from the bad. Knowing that students are utilizing this tool might trigger a greater paradigm shift in math education. Instead of the rote memorization of and regurgitation of mathematical process, students are now suddenly required  to think and defend their thinking with evidence from their own conclusions! Imagine that, a student using some information provided, identifying the problem, developing a solution and defending that solution with evidence of their own work; sounds like what math class should be.  Maybe this app is exactly what teachers need, a little reminder that computers can take our place, unless we shift what we actually teach. Content is merely a vehicle that can be used to teach how to think critically, solve problems, and defend and communicate conclusions. I think we need more apps like this to trigger the paradigm shift education needs to really start teaching students to think, instead of how to play the game to get an A...what is an A anyway? Does an A really matter? Why does regurgitation get me an A? 

Tuesday, September 1, 2015

Google Keep vs Evernote...

Which do you prefer, Google Keep or Evernote? I'm switching to Google Keep. My hand writing is horrible, and as a result, I use a digital teacher planner. Recently I have been using Evernote as my planner. The interface is friendly, it can organize my notes into "binders," I can find old notes and edit notes to add class reflections. It seemed to work. However, I recently swapped to Google Keep, accidentally. For some reason, the digital world was in one of those moods where all tech was out to get me. The password I thought I had been using for Evernote, suddenly decided to not work anymore. Out of annoyance and a in a pinch for time, I didn't feel like going through the embarrassment of admitting to Evernote that I forgot my password. So, I quickly turned to Keep on my Android and got my planning done.  Now I'm hooked on Keep.  It's not quite as fancy as Evernote, with binders and a fancy sliding interface. But, I am finding that I like Google Keep more than Evernote. Here are 3 reasons why I am making the permanent switch to Keep.

  1. Google Keep creates easy checkboxes that I can project as my class agenda, and check them off as students finish a task. It makes that stagnant whiteboard agenda more engaging and shows the students that we are accomplishing tasks and moving forward. Putting that check there is just a really good feeling. 
  2. Google Keep allows me to copy my notes to Google Drive. In Eevernote I would organize binders to be able to refer back to notes and lesson reflections quite often. With Keep, I can do the same organization, but it all happens in my drive. I use Google Apps obsessively with students, so one stop shopping is very nice. 
  3. The Google Keep interface is wicked simple. I mean, wicked simple. You add a note, you have a few editing options, and it stays there. There are really no major distracting bells and whistles with Keep. It does exactly what it says it does; "Hang on to every thought and find it right when you need it." I can make a note, find it very quickly, and edit it from any device, throw it into Google Drive, and archive notes for later.  
In my transition to Keep I decided to keep the interface very clean, archive notes, and copy everything to drive. I try to keep no more than 5 notes at a time on the screen. I want it to be simple, and easy to find what I need.  Just my like my Linux desktop, clean and simple.

Where do you stand, Google Keep or Evernote

Sunday, August 30, 2015

6 Online Resources for Virtual PD

Professional development can be easier than you thought. Typically, when PD comes to mind you think of the traditional conference, or huge meeting where a speaker tells you about some topic relevant to education. Sometimes these are useful and helpful, other times, unfortunately, you discover they are not that great. I occasionally run PD opportunities for teachers on integrating technology. My mantra is always..."please don't let this suck, don't make it be one of THOSE" I think you all know what I mean by "THOSE."

 Professional development opportunities are tricky to find and tricky to attend. It often requires you to be out of the classroom away from your students. It's a bit funny how it works, you typically leave the school and your students for a day to learn how to better do something with your school and your students. You would think that it would work better if you were in your classroom with your students and the PD came to you.

Well, it can, with some creativity. I have found some great PD opportunities online and have been able to squeeze them in, without leaving my classroom, or ditch my students, and haven't had to spend a ton of money. Here's the magical acronym MOOC. I imagine that is not a new term for anyone, regardless, a MOOC or massive open online course is an opportunity to participate in a PD or furthering education courses related to your profession. There are a ton of free MOOC's and a ton of organizations that offer great courses. Here is a short list of a few places for some great Education MOOC's that can be used for PD.


Coursera
Coursera is a place to access free online courses offered by known colleges. Some topics many not specifically be geared toward teachers, but I bet you could find something useful. I have singed up for courses only to be able to access more materials that I might be able to use with my students.

Udemy
Udemy is another place to access free online courses in various topics. Again, they are not specifically only education related courses. However, many of the courses are free, provide great resources and can be used for professional development or just for your own enrichment.

PBS Teacherline
PBS Teacherline is geared directly for educators. There are a variety of courses, some which are free, some are paid, and some are available for course credit.

ScholasticU
ScholasticU is a cool resource for teachers, however, it is pricey for an individual. I don't know about you, but my classroom budget is fairly small. Enough to obtain the necessities. This tool is really geared towards use within multiple schools in the district. If you look at the pricing chart, you'll notice that the price breakout is per school. You would be better off approaching your administration of superintendent and presenting the benefits of online options to them. School administrators want us in our classrooms working with students and they want us to continue to learn how to be better teachers, it should be an easy persuasive conversation to set up an account, hopefully. Regardless, there are great opportunities through this resource.

ASCD
ASCD has a large selection of professional development for teachers and is very reasonable priced. They do not offer courses for graduate credit, this is strictly professional development opportunities. However, the topics they offer are intriguing and the course I attended offered great ideas and resources.

Teachers First
Teachers First is a great place to take a course without doing much at all. You essentially sign up for a course, kick back and watch. The courses gain you access to moderators discussing the topic at hand and share the information through live videos. It is just like being in one of those professional development opportunities that school administrators provide for you, except you don't have to leave your classroom and can fit it in when it is convenient for you.


There are other sites and resources out there, but these sites listed here are places that I have used and have liked using for professional development. In my opinion, online PD is a huge time saver and money saver. You will not need to leave school for the day and arrange a substitute, you won't have to pay for a course, pay to travel, pay for food and then hope that the course is worthwhile. If you are looking for taking courses for credit, I would look through the PBSteacherline resource. There are great courses for credit, and the prices are not too bad.

Wednesday, August 26, 2015

Publitas, a pdf publisher for large documents.

I stumbled across Publitas today. It is a a very cool PDF publisher and viewer that enables the user to upload and share very large documents. It is marketed as a digital catalog, magazine, and brochure publisher and viewer, but it also works really well for large ebooks.

In the past, I've promoted ISSUU for it's simplicity, and unique viewer. I still like and use ISSUU, but recently I ran into a snag. The digital document I wanted to share with students was too large for my free account. So I thought I would just use Google. Unfortunately, the document was also too large for the Google pdf viewer. I tried Scribd, but the upload never completed. So I thought I would try adding an add-on to Drive that would open the document. That worked, but then I wasn't able to share the document through Google Classroom to send students directly to the reading. They would have to go to classroom, follow the link to drive, make sure they have the same add-on installed, then make sure to "open with" the appropriate add-on before they could view the document.  I don't' know about you, but if some of my students have a multi step process just to access work, they "check out" before they even start.

So, I searched around and stumbled across Publitas. Again, it is marketed as a free pdf catalog, brochure and magazine viewer. I contemplated the obnoxious size of a catalog and concluded that there is no way my earth science open document is as large as a catalog, so it should work fine.  I made an account and uploaded my first document. And, just like that, problem solved.  I  now have an online viewer, similar to ISSUU than can host and share documents larger than 100 MB. Best of all, it is easy to share to students. If you have the rights to a document that is too large for other online readers, try Publitas. It was quick to set up, quick to publish, and quick to share documents.

Monday, August 24, 2015

3 Tools For The First Day

As many of you know, a new school year is upon us. Like most teachers I do take some time off. However, most of my summer is dedicated to teaching at a unique school that does not use overwhelming technology tools with students. The philosophy of the school is to kindle communication through socialization and vocational education. Allow me to rephrase that, we teach students to use different technology tools to provide tangible results, such as various hand tools, carpentry tools, various farm equipment, and the most important tool, your own voice for communication. As I start my new school year, I  reflect on my summer experiences and the emerging tech I used last year. Here is a quick list of tools I plan to use on day one with my students.

Socrative: This is a great student response tool, but on the first day, I plan to have a space race with some basic science questions and few tricky logic questions thrown in there. I'm not sure what the winning team will get yet. It will most likely be something simple, like some big hero 6 stickers or frozen stickers. Who knows, maybe I'll award them with some impromptu poppin'.

Google Classroom: I use Google classroom as my virtual classroom. It doesn't have as many public features and parental involvement options like schoology might have, but it is a nice tool to streamline google apps. I use Google classroom to share my course syllabus, any paperwork that needs to get home, and of course for classroom discussions and assignments. I find it to be a very simple way to create a pseudo virtual classroom.

Google Maps/Earth: I teach earth science. This is a solid tool for almost everything in earth science. I have students make maps for climate, weather, natural resources, geology, plate tectonics, stream morphology...etc. I would argue that this is my "workbook" for my classroom. On day one, we will make a map of our local area naming mountains, lakes, rivers, streams...etc. It's a fun activity to introduce the tool for more than stalking a friend on street view. I group Earth and Maps together because they talk to each other fairly well, and each tool offers it's own strengths. I won't go into the two here (keep an eye out for a future post.)

The final tool we will use will be....you guessed it, our own voices for communication. It's an underestimated piece of technology, yet, many students forget how to use this tool and forget how to interact face-to-face. So, I have a unique challenge planned out, one that takes away your sight and only relies on your voice to communicate your needs. Lets face it, as a student you need to be able to voice your concerns, otherwise you're left behind, even though we aren't supposed to leave any child behind, so if you learn to communicate Every Child Achieves.

Day 2 will be saved for all the boring paperwork, developing classroom expectations, discussing the "no grading" grading policy, discussing my "no homework" homework policy, and most importantly discussing the expectation to have fun while learning.

Sunday, July 12, 2015

Google Classroom Assignments to Calendar


     I stumbled across a very cool article today. It has great directions for creating your own script to sync Google Classroom with Google Calendar. Now, I'll be honest, I looked at the article and went...holy $**t that's a lot of work for a simple task. Then I asked myself, "is it really worth the effort?" I'm not lazy, but I don't want to take a lot of time setting up something that needs a lot of maintenance and tweaking. However, this article got me thinking. If someone has already written a script to do this, it is just a matter of time before Google adopts it and includes it right into classroom for those of us who have other things that require attention. I mean, Google Classroom spawned from Doctopus, eventually they will add this feature.

 But, if you are in dire need of being able to sync Calendar to Classroom, follow the tutorial here and you'll be happy.


Wednesday, July 8, 2015

Music Soothes the Beast

I'll be blunt and put it right out there...my students call me a hippie. Which, I take as a compliment. I am peaceful, loving, accepting to all walks of life, and am typically very calm (my 3 year old can unravel that calm and unleash the beast, but a 3 year old has magical powers to amaze and annoy within a matter of seconds.) But, I digress, the point is my students call me hippie, I'm guessing it's mostly because every class starts with Jerry jamming in the background while students enter and begin to settle into the routine. If it isn't Jerry its Trey, if it isn't Trey it's Melodious, a.k.a Thelonious Monk.

So why am I talking about music on a technology for education page? Here are some good music streaming sites, and a few reasons why musics sets the tone* of the class.

*yep, that was intended

First, here are some great streaming tools that are, of course, free.

  1.   Google Music - it speaks for itself. Upload your own, purchase, or stream channels from other users.
  2.   Pandora Radio - You have two options with this one, paid or free. The free version is the same, but with ads. Essentially, you're paying to remove commercials. It has a tendency to downward spiral into weirdness. For example, a station with Grateful Dead will throw in a   Zeppelin song, which is a good mix, but suddenly you're onto a classic rock spiral that gets way far away from the Dead. Or, you put on the Allman Brothers Band and it will horribly spiral into country music. Which will cause you to delete the channel immediately. However, you can combat these downward spirals  if you take the time to "thumbs up or down" certain songs to tweak your channel.
  3. Archive.org - This is your best place to find live music. You can stream and download shows of just about any decent band you can think of. It is now also affiliated with etree.org and 
  4.  Slacker Radio - This is similar to Pandora, the track selection is not quite as deep, but allows you to create some unique channels of your liking. Again it takes some time to customize the channel to avoid downward spirals. Again, the paid service really only removes advertisements. 
  5. Spotify - This isn't my first choice, only because it requires a download and an install. I like to keep things in the cloud. It is a decent service, it allows you to archive your local music, create custom radio stations. However, it always thinks you want to listen to terrible pop, and always wants to share with facebook. 
  6. iTunes - I'll mention this one, only because people know of the service. I don't think it is worth the download and install. In my experience, it always needs an update, it is slow, the store requires so much verification, to the point where you eventually just give up on your purchase and turn to a different place to buy it. It's not friendly with many devices, and the new streaming service is only specific to mac devices. I won't go into this much further. 
OK, so why music? Well music truely does soothe the beast. If you have some ramped up music playing, you will see the energy level of your students rise, to a point where they are out of control. If you play some jazz, or relaxing jam band music, you'll see the energy level reduce and become more focused. The music choice really does set the tone of the classroom. Many times I'll hear students come in and complain about the music playing, but within minutes they are sitting at their table, doing their introductory work, and tapping along with the beat. On the days, that I don't have music playing, I've discovered that these intro activities are a bit more cumbersome to start.  Again, the choice of music is key for the energy you want in the classroom. If you want your students to be very energetic and distracted, then put on current pop music or country music. ( I would never play country in school. Many of the lyrics, and themes are not appropriate, and in my opinion, the music is not all that interesting. However, it ramps up students). If you are looking for alert, but calm, then Jazz is the way to go, hands down. (Medeski Martin and Wood is a great choice for this energy.) If you're looking for calm, quiet, relaxed, and focused I would suggest a jam band of some flavor. Of course as you really dive into various music styles there are various intricacies in flavor. The point is, the right tone can create that attitude adjustment you need to maintain focus and hard work. So rock, on and work with tunes in the background. 

Tuesday, June 30, 2015

There isn't an app for that!

It has been quite some time since I last wrote a post. Those that care to read, sorry for the delay. Those of you that know me, know that summer is a time for me to focus on my other true calling; farming. I also use the summer to take time to teach at a unique school where communication, farming and other vocational work effectively tie into learning. I bet you never stopped to think about the physics, history and math that goes into choosing the proper shovel for a job? (not all shovels are for digging). Which brings me around to my point. There isn't an app for that.

You couldn't find an app to tell you what type of shovel to use, and if you are looking for that app you should probably find an app that can call someone else to do the job for you. Sorry to be so harsh, but technology has made us soft, in terms of actual work and learning. The best way to learn these lessons is from physically interacting with people who can pass this knowledge along by asking questions, and getting your hands dirty. Sure, there is an appropriate time and place for technology, but when is it too much?

During the time I've been avoiding writing I've done a lot of reading and reflecting on technology use in education. And, just like everything else that is engulfed by teachers, the use of technology to enhance education has blown way out of proportion. There is too much tech, too much pressure to use tech, and too much focus on the best tool to teach. Many of you know my classroom, and know how I interact with students. I treat them as equals, speak to them as equals, redirect them as equals, joke with them as equals, learn with them as equals, and discuss real relevant life events...you guessed it..as equals. It is perfectly OK to take 10 minutes to discuss issues like a jail break, the death of a pet, the song that's stuck in their head, the movie they love, a fight with a loved one...etc. How else are students supposed to learn how to deal with these real life issues, from misguided media that is only looking for good entertainment?

If you were to walk into my classroom, when the year is under way you would either catch me talking about a story I heard on the news, responding to a story a student has told, or seeing us gather gear for a lesson in the shop or outside. My classroom is filled with various projects, student built contraptions, student creations, science gear, samples, maps, and best of all tools. I have discovered that the best student engagement occurs when  they are comfortable communicating about anything and by using a tool. Not a typical piece of technology, but a tool. Something like a shovel, a skill saw, a miter saw, a hammer, a measuring tape, a chisel, a soil auger, things that require awareness of surroundings, critical thinking, and communication.

Sure, technology can offer and even enhance these skills under certain conditions, but educators have started to lose site of the goal. We are supposed to teach students skills to help them become productive members of society. There isn't an app for that. We have to put down the tech, get our hands dirty, and teach. I am guilty of trying to use too much tech, and need to tone it back. Which only means I plan to incorporate more hands on learning. So, my hikes will be longer to get to those good geology sites, the samples will be more substantial, and the work will be more meaningful. The sugar house will get built by students before winter, students will have the compost system up and running by fall, and best of all, this will all be something students can look back at and say...I built that and learned "this" as a result. There isn't an app for that, and teachers need to stop searching for those apps. Students need to discover that many times the best solution is to learn how to do it yourself. This requires using your own hands and brain, and learn by asking someone else the right questions. Google can't show you how design the field equipment you just invented to then use a skill saw to cut the custom angle for the board needed on that design.

So, as many educators enjoy summer, take time to reflect on ways to reduce the use of tech for the sake of using tech, and discover ways to ensure that an app can't teach your class.

Tuesday, April 21, 2015

Multiple Teachers in Google Classroom.

 Google finally added the option to add multiple teachers in Google Classroom. Here is how.

  1. Log into you classroom
  2.  Click About.
  3. Click "Invite Teachers"
  4. Select the teachers to invite and viola. Just like that you have multiple teachers able to post assignments, grade, share resources and do all the good classroom things. 


Add caption

Monday, March 23, 2015

Really "flipping" the classroom.

Technology use in schools has been a buzz word since I became a teacher eight years ago. At that time I wasn't sure why it was such a "new" idea. I mean, I left a career in science that was flooded with technology. It was second nature to use various tech tools on a daily basis. However, most of these tools were presented in such a way where we had to use them to "create" a solution. It seems that technology in schools has become a little stuck.

I recently read a post from Vicki Davis that reminded me that technology is more than a substitute for paper, books, and pencils. I took a moment to reflect on my own teaching to find areas where technology is a substitute and where it is used to create. As I was reflecting, I realized something; there are places where technology is a substitute and it is OK. Like using Google Docs, or Slides, or digital media. But, more importantly I realized that my classroom really is "flipped." Not in the sense that flipped is used in educational technology, but flipped in the Constructivist sense. Somehow I've been able to evolve my classroom into an environment where students are comfortable to direct their own learning and reflect on the process to realize what knowledge they gained from those experiences. As the teacher, I  guide them toward opportunities to engage with the content, but the project based, problem solving that occurs  grasps the idea of using technology to create, as Vicki Davis describes.
borrowed from Pixabay

I am looking forward to school tomorrow for many reasons;

  At the end of one class a  student showed me the amazing website she built for a virtual project tour. I am excited to see the creativity of the rest of the class.

Another student shared a great idea where students will use their understanding of various Earth systems to design a Utopian Solar System to support carbon based life.

Another class has been tinkering with robotics and the use of robots for space exploration. The end of the unit arrived with some audible disappointment. However, a student shared one more idea for  project that will use robotics for another Astronomy concept.

Planning for the next project was completed by my students. The technology that will be used to engage in learning activities was also driven by them. My role is to outline the project to ensure these ideas align with the curriculum by creating appropriate assessments framed by the Next Generation Science Standards and Common Core State Standards. I also need to provide access to appropriate technology tools.  "Flipping the classroom" is more than giving the students a technology tool to complete classwork at home...in other words; providing a tool to do different kind of homework. It is more of letting go of the "Sage on The Stage" mentality, listening to students, and using their ideas. Students are creative individuals and their creativity should be encouraged to help direct the learning of the entire classroom.

Saturday, March 14, 2015

Increased Readability

Getting students to read in the classroom always poses a challenge. Here is the typical scenario, the teacher assigns a reading complete with appropriate "pre, during, and post" reading strategies that are creative and engaging to hopefully increase student participation. Most students will do the work, but may not truly grasp all the information. Here is the typical student reaction to the reading;
They flip to the first page, stare at it for a few minutes, maybe read a sentence or two. Then they get distracted by something for a few minutes, go back to the reading and realize they don't know what they just read so they go back to the beginning. Then they are frustrated with having to start over, so they start to look how much they have to read. They then bend the book back and physically hold the chunk of the pages they need to read, and stare at it with a look of defeat and wonder how they will ever get through it all. Then, they start again, only to go through this whole process again before asking if they can go to the bathroom.  

 It is clear they are simply reading for the sake of getting through the assignment they aren't really getting much from it, despite the efforts you put forth with the reading strategies. Here is my super secret process for getting students to focus on the content and not the amount.

Super Secret Tips

  1. Choose current, relevant topics that are short, sweet, and right to the point. Some of my favorite science places to obtain good articles are:
      1. NPR Science
      2. BBC Science
      3. Smithsonian TweenTribune
      4. Student Science
  2. If I need to use other readings from a book or text book, obtain digital copies, and again use recent publications. My textbooks from 1992 are really just good for a weight or building material for some lab activities. They make really good holders for Popsicle stick bridges, great walls for Lego Robot courses, awesome supports for ramps when doing acceleration and velocity experiments, they also work really well to hold down the end of a board for pendulum demonstrations. 
  3.  This is super important for this final trick...Use a digital formats. This will allow you to use various reader tools to adjust how much text will show on a single page. 
Now, the moment you've been reading on for, the final trick!

Use an appropriate reader tool to make the font huge, and limit the amount of text that appears on a page. You need the digital format to work in your favor, meaning that you want the format to keep your students engaged and feel as though they are making progress. Essentially, you are taking away the "chunk of pages" they want as visual cue to the finish line.The trick is to make the text as big as possible, and adjust the formatting to squeeze two to three paragraphs on a single page. It feels like you are cruising through the reading, and there is not an overwhelming amount of text on a page to throw you for a loop. 

I will use one of these two methods.

My first option, if I already have an epub, or mobi in the correct format is to use a online  tool for chrome called Read &Write for Google. What this does is allow me to upload my epub, mobi, azw3, pdf...etc to Google drive, share the document with students, and let them open the edoc. The app provides a nice online viewer that has the described format of a large font and limited text per page. 

Or, I use Issuu to share documents with my students for reading purposes. Issuu does a fantastic job making the digital format feel like a physical book. To obtain this trick I have students choose the single page mode, and zoom way into the document.  This requires students manually adjusting the settings, it may not be quite as effective. 


Monday, March 9, 2015

Google Docs Image Edits

There are occasions when you need to include an image to a Google doc and you might have to insert arrows, highlights, or edit the image to fit your needs.  Here is how to insert any image into a Google doc to allow you to include these minor adjustments.
  1. Create your Google Doc. 
  2. Insert a "Drawing"
  3. In the Drawing window click "Insert"
  4. Select "Image"
  5. Grab the image you need from wherever it is located. 
  6. Make the adjustments you want. 
  7. Click save and close
The image will be inserted into your Google doc at your cursor. 


A Positive Social Media Experience in School

I stumbled across and interesting competition on-line. Being the season of basketball madness, a group of scientists organized the Mammal March Madness.  Essentially it is a match up between species of varying habitats to determine who could "survive" in head to head species competition. This seems like a great opportunity for Biology and Ecology students to perform relevant research on the species to be able to make an educated decisions about survival. Just as we seen in the natural world, the native species may not always be victorious, the one who can out compete for resources has a strong advantage.


The "battles" will be play-out in "real-time" through Twitter at #2015MMM. In order to be able to view the results at school, twitter would need to be an acceptable resource to use. In my school district, as well as many others, all social media sites are blocked by network security. It seems like many school districts block these sites as a way to combat cyber-bullying.


Which is a serious matter and one where students should learn the laws and regulations and understand that their digital citizenship matters. Social media is all around us and is something students should learn how to appropriately use. I recently read an article that is related to a similar issue of personal smart phones and other devices being blocked by schools, to only result in retaliation from students to use the tools secretly.  Should we "block" these tools from our students or should we teach them how to use them to further their education and careers? I'm of the mindset that social media etiquette should be taught in schools, cyber-bullying should be faced head-on just like all other forms of bullying and harassment, and students should learn how to actually use the powerful devices they carry around. They have so much information readily available at the touch of a screen. While the Mammal March Madness seems like a very engaging, entertaining, and unique educational activity, access to social media is a key player for the full experience.

Even though my school has twitter blocked, I still plan to run this activity with my students, and access the live tweets of mammalian battles in a round about way. I will simply save the "search" of the hash-tag from my personal twitter account at home.  Then I will print the search to Google drive for my students to view the next day in school. This will help them experience some of the excitement of the "real-time" matches and also provide the opportunity to view the details as they unfolded and follow the reactions of other players.

Here is how to save a search in twitter and archive for later.


  1. Sign in to your Twitter account.
  2. Type your search query into the search box at the top of the page and hit return or click the magnifying glass icon.
  3. Click Save at the top right corner of your search Results
  4. Click anywhere in the search box at the top of the page.
  5. Scroll to your Saved Searches and click on the saved search to revisit the results
  6. To archive the search, scroll down the list to the farthest tweet back you want to save and use this chrome addon either in chrome or opera to save to Google drive. 

Good luck to those of you who fill out a bracket, have fun, and use creative, but safe alternatives to access blocked tools at school.


Thursday, March 5, 2015

How to quickly enable/disable the Confidentiality Notice in gmail.

Most teachers should have a notice like this attached to their emails...

CONFIDENTIALITY NOTICE:

This e-mail message, including any attachments, is intended for the sole
use of the intended recipient(s) to whom it is addressed and may contain information that is legally privileged, confidential and exempt from disclosure under applicable law. If you are not the intended recipient, you are hereby notified that any disclosure, copying, distribution, use and or taking any action on reliance on the contents of this electronic mail message, confidential information is strictly prohibited (Fed Reg 42CFR, part 2). If you have received this e-mail in error, please notify us immediately or arrange for return of the original electronic mail transmission.
-- 

This essentially adds a layer of protection to you with your parent/guardian correspondence. It reminds the recipient that the conversation is confidential and shouldn't be shared with anyone outside of the immediate concern.

Adding this to gmail is easy. Typically, users will add it as part of their signature.  However, there are times when you may not need to have this notice, like if you are corresponding internally to colleagues with just a quick note like "The team meeting today is canceled." You don't necessarily need the notice with this type of message.

Here is how you can quickly turn this on and off in gmail, as needed.

1) Log into your gmail.
2) Click the gear icon and select settings.
3) Navigate to labs and enable "canned responses"
4) Save your changes, gmail will reload.
5) Compose a new message. You can leave the To: and Subject: lines blank.
6) Insert you confidentiality notice into the body of the email.
7) Click the little down arrow next to the trash can, and select "canned responses."
8) Select "new canned response"  give it a name like "confidential" then hit ok.
9) Now when you are typing an email that warrants the notice, simply hit the arrow again
10) Select canned response and insert the one you just made.

This will allow you to quickly enable the notice as needed, depending on the nature of the email.


Tuesday, March 3, 2015

BYOD

Many schools offer 1:1 programs for students. If you are unfamiliar with the concept, the school provides a device to the student to use as their "own" for the length of time they are a student in that school or district. There are various pro's and con's to this kind of program, but that is a larger debate. My school is not lucky enough to offer such a program, yet. I will keep pushing until it happens, but until then we need to be creative. It can also be challenging to book computer labs and laptops for students when they are in high demand among all teachers. How can I create a 1:1 environment and deliver a flipped classroom that is all the rage these days, when the technology isn't quite there?

http://dilbert.com/strip/2008-05-28
Here's how:

My school has a unique cell phone/personal device policy. Students are allowed to bring
them to school, use them "freely" at certain times and places throughout the day and are allowed to use them at teacher discretion. Within any given class a teacher could assume that 99% of the students in that room have some kind of personal device on them. One that is capable of accessing the Internet and use as a pseudo 1:1 environment. Allowing students to use their own devices that they are comfortable with  and really know how to use, can be a huge advantage compared to giving them a device and saying "Here. You have to use this."  It is not uncommon to walk through my classroom and see various devices out and about. If you were to look at the screens of those devices you would see many of the same apps running; Google Classroom, Google Scholar, Wikipedia, and Issuu. I allow my students to use their devices, and encourage the use for learning purposes. It helps provide that 1:1 environment without purchasing a device. This also allows me to use Google Classroom as a mechanism for a flipped environment. Knowing that 99% of students have a device, and 99% of them can get access from home, I am confident that I can deliver a flipped environment through various devices.

Now what about that 1% of students who do not have devices? Here's where the hoarder creative teacher comes into play. First and foremost, teachers are hoarders. If we hone those skills to hoard "old" technology,  we can provide for our students. I have been able to obtain 35 "old" desktop machines, 3 "old" laptops, 8 "old" netbooks, and I am always on the lookout for more. These "old" machines are ones that were labeled as trash, because they were slow, or had windows xp. The easy solution was to wipe the hard drive and install Linux. Just like that, these "old" machines are speedier, and more responsive then the brand new machines kicking around the building. This allows me the freedom to sign out machines to students who might need them. I really only have 11 machines that are practical to sign out, however that is 11 students that I can provide that 1:1 for if they do not have their own device.

I mentioned that a BYOD (Bring Your Own Device) is advantageous to a 1:1 setting. Think about the one device you have that you really love to use. Think about how well you can use that device to find out something completely random and useless like what was the name of the horror movie that kick started Julia Louis-Dreyfus's career?  Now if I handed you a random device and asked you the same question, how much longer and how much more frustrated might you get trying to find the same information? Compound that by a million to understand how a student might feel when they are asked to find some serious information related to the content on a device they don't like and don't really know how to use. This is where their own device eases the pain of researching content information.

To conclude this long winded post, if your school policy allows for it, and you do not have a 1:1 program, or your 1:1 program is struggling, try letting students use their own devices. You might be surprised at the results.

Monday, March 2, 2015

Chrome Distill Option

Chrome seems to be one of the popular browsers for education...(in due time Opera will take over, but that's just my opinion). Chrome is packed full with extensions, add-ons, security, speed...etc. All the features you'd want in a browser. One of my favorite add-ons for education has been Clearly. This is a nice simple tool that allows you to distill the page to leave you with simple text, and quickly export the information to your Evernote account, if you choose.

However, Chrome has made the distill process much simpler...sort-of.  It is embedded into the browser. There is a tiny trick to turn it on, but once you do, it invokes the cleanliness of Clearly right in the browser, without any add-ons. However, you won't have the options that Clearly offers, but you still can access the native distill option for clean reading. Here is how.

1) Regardless of your OS, find your Chrome launcher.
2) Navigate to the properties of that launcher, typically a "right-click" will bring up a menu to find properties.
3) in the "target" box or "launch Command" add this at the end
--enable-dom-distiller

Here is a screen shot of mine (Note, i'm running Linux and using Cairo-Dock as my launcher so the screen is going to look different)

the full command for me is
google-chrome-unstable --enable-dom-distiller

In windows, when you right click the launcher and select properties, a window will pop up. In the text box called "target" add this after the last quotation mark
--enable-dom-distiller

Once chrome starts, when you click on the menu icon...you know those three little bars in the upper right, you will now have an option that says
Distill Page


Select this option when you are on a news article, or a website that you want to read without the distraction of ads, sidebars, other posts...etc. Again, all this does is exactly what Clearly.does, without the bells and whistles, and without installing any third party tools.

(on a side note: The color of the screen-shots are a result of my desktop set up. I use all dark colors for all applications, and tools on my laptop. This is mainly for two reasons. First it saves battery life...big time. You may have a different opinion, but when I use the default settings of black on white,  my battery drops significantly fast.  Second; it reduces eye strain. The light on dark is easier on the eye, especially when reading at night, or reading for extended periods of time. Try it on your kindle or nook, you can read way longer!  Third; it just looks good)

Thursday, February 26, 2015

Three Great Sites for Weather Data

As an Earth Science teacher, weather is always a fun topic to cover with students. We all experience weather everyday, but we hardly ever take the time to stop and truly understand what it is we are experiencing, and wonder why. Within the NGSS the approach towards weather focuses more on interpreting data, drawing conclusions, creating models, and making predictions. (Sounds like science.) However, it can sometimes be difficult to collect enough data in the course of a unit to identify trends and be able to draw accurate conclusions. Here are three great sites that can be used to collect a lot of data and gather more than enough information to start to understand weather. These are also great sites for the "device" weather fanatic that absolutely needs to know if it is sunny out without looking out the window. (I think you all know who I mean...I'm guilty at times)

Weather Underground

While there is always debate about who has the most accurate prediction, this site remains my favorite and most reliable. There are so many features hidden thorough-out the site. You can gather overwhelming amounts of real-time data. There are various reports about air quality, snow depth, mountain conditions, ocean conditions, tides, sunrise and set, moon phase, moon rise and set, 10 day forecasts, historic data, radar, satellite maps, ocean buoy data, real-time interactive maps...etc. The list goes on and on. If you want some really extensive weather data, this is the one-stop-shopping you're looking for. If you need it, it is here. (The surf reports and ocean models are more accurate than your local surf shop.)


NOAA and the NWS

This site offers all the same data as Weather Underground, and more. There is a ton of climate data, long range predictions, precipitation data, river and stream level information, atmospheric condition notifications, like pollen and ozone levels, historic data, explanations, warnings, and great real-time data. My only complaint from a student angle, is the site is a not all that engaging to look at and collect the data. The maps are somewhat stagnant, the site layout is bland and as a result students lose focus. However, for those moments when you are the hardcore weather geek and need a lot of data, you'll find all that you need here.

Weatherspark. 

This tool really only offers real-time data for specific locations. However, the visual presentation, and interactive graphical representations are very engaging for students. This site is very helpful for predicting weather based on previous events and extrapolating the patterns. Students gravitate towards this site because all the "instant gratification" needs are met. You can obtain real-time data very easily.

Combining these three tools will provide students with so much data that you'll need to drag out the green screen technology to have them film their own weather reports.

Saturday, February 21, 2015

Google Forms Limiter add-on

I just ran a mini Google Forms how-to-session for a small group of teachers. I failed to mention this fantastic add-on. So I thought I would post it here and share it with everyone.

The Form Limiter add-on in Google forms allows you to stop collecting responses after a set number or date. Which can be very useful. Especially if you have "wiseguy" students filling out a form. Although, we all know that all of our students are angels and would never submit a form with a fake name...right? On a more serious note, this add-on does help to regulate how long a form is available for responses, and can limit the amount of responses.


Here's how it works...
Once you have the add-on you have two choices to limit your form
1) limit by date and time
or
2) limit by max number of responses.


If you select the first choice (date adn time) simply include a stop date and time, along with a custom message to the form submitter, and opt in for an email notification as well.


If you choose the second option (max number of responses). Simply enter the max number of responses you want, set a default message to anyone who submits after that number has been met, and opt in for an email notification.


This will help keep some of those unwanted or un-needed responses at bay.

Friday, February 20, 2015

My Top 5 Favorite Tools

I decided it's about time to share some of my favorite tools to use with students. Here is a short list and a short description of each tool. These are in no particular order, they are just my go-to tools.


Classroom
This tool has easily transformed my classroom into a blended environment. I teach my students to use the tool, and we use it often enough that it becomes second nature. When the occasional day arrives that I am not in school, Google Classroom can sort of fill my shoes for the day and keep the lessons running smooth. It also works great if you are at a conference and will have time to log in and interact with students, teaching remotely is very helpful.

ISSUU
I use this two on two different levels. I publish documents for my students, and they will use it to publish documents to share with the class or with me. If you are unfamiliar with the tool, it offers a free account, with some limitations, but the user can upload documents to share. I have used this to upload private ebooks and share experts with my students. Just like if I were to photocopy the pages. I upload the selection pulled from my kindle and share it here with students. There are options to make the document public, private, download-able, or read only. I usually set my documents to private, and read only to share with students. I feel this helps to protect some copyright boundaries. Again, it is similar to a photo copy. However the interface provides a nice on screen reader that feels like the physical document.

Here is a sample of a reading I borrowed from CK-12 for my Earth Science Students. The original document can be found here. However, this interface is a bit more engaging for students.


On the student side of this tool, I have had them take their lab reports typed in Google docs and upload them to ISSUU to share with the class for a peer review session. Many times I have lab activities where students are posed with the same scientific problem, but there are various solutions. It is nice to have them share their publications like real scientists.

Prezi
I know, it's an oldie, but it is still a better way to break up that linear slide show. I like to have students use this tool to create interactive info-graphics. Recently, students made a Star Life Cycle diagram with prezi that follows a specific star type through nuclear fusion all the way until it's "death."

I've also used prezi to create the rock cycle, plate boundary models, fault type models, and we have used it as a presentation tool. It helps to limit the amount of reading a student will try and do, during a presentation. Prezi forces you to be concise.


Keep

This is a handy note taking, to-do list tool. At my school students are allowed to "BYOD" (bring your own device). This is a nice app for students to quickly take a note when we are out in the field, quickly jot down a homework assignment, or a resource. It is accessible across your Google account and has a simple interface. It's just a nice simple note-taking tool with some simple bells and whistles.


Google Docs
If you don't know by now....But, just by chance you haven't heard; Google Docs is a cloud word processing tool that easily allows for collaboration of work, organizing documents, and accessing documents across devices. With the addition of add-ons the tools has become so much more powerful, and it goes hand-in-hand with Google Classroom. The new Speech Recognition add-on is awesome for note taking during teacher meetings. It's a bit clunky, but it gets the gist.

Wednesday, January 28, 2015

Keeping Student Work!

In the previous post, there are directions for archiving your Google Classroom for future reference. While I went through this process with my previous classes, I looked around my classroom at all the student work  piled up on shelves, overflowing from cabinets, and collecting dust on counter tops. I realized two things;

First, my classroom is a mess and needs some organization overhauling.

Second, I wondered if there was a better way to archive student work.

Then, my new fancy S4 caught my eye.  I had a great idea, I could take video and describe the work to create a video archive, I also thought of becoming the photography I always wanted to be and take tons of pictures to make a digital archive. Then I decided to do what I do best, let me ask Google for ideas.

Sure enough, Google prevailed and I stumbled across Richard Bryne's blog all about this exact idea. The blog has great ideas for using iPad apps, the only thing is I don't have an iPad, nor do I want one. (This is a topic for a larger debate.) However, I think Skitch will help do what I want and let me use my S4 for more than playing music. Thanks to Mr. Bryne's blog, I found a great tool to aid me with de-cluttering my classroom while being able to continue hoarding student work. I'll just fill up yet another Dropbox account instead of over-stuffing my classroom.  I'll become a digital hoarder rather than a physical hoarder...not sure what is better, but at least my classroom will be clear.

Sunday, January 18, 2015

Archive Classes in Google Classroom

Those of us who are secondary educators on a block schedule, are wrapping up the first semester...but, what do we do with all those Google Classrooms we made, and what do we do with the student work? Most teachers are "student work hoarders." Meaning that, we like to save everything we've done with a class, for various reasons. Sometimes, you have great student work you'd like to reference later, or sometimes you have an amazing assignment that you'd like to reuse, for whatever reason, we often save everything. Usually, to the point where all our file cabinets are overflowing. With the help of Google we are reducing our paper trail, yet we still want to save our work. So here is how to Archive your old Google Classroom page.

1) Log into Google Classroom
2) On your "Home" page, locate the classroom you want to archive.
3) Click the three dots in the right-hand corner of the classroom and select archive.


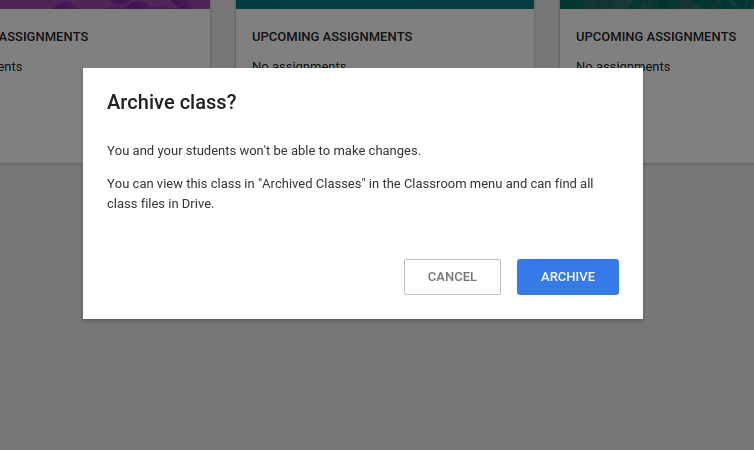
4) You'll see this "warning." Select "ARCHIVE"


Once archived, you'll have a new menu option nestled under "home" called "Archived Classes."
You will still be able to see the classroom, and access student work, however, "you won't be able to make changes."  (Hence the warning that pops up.)


Once you open the archived class, you can still view everything, and there are options to restore the classroom if you need to make changes.


Saturday, January 10, 2015

Search Ted Talks from Chromebook File Manager

Since my last post was a novel, here is a nice quick and easy tip.

You can peruse Ted Talks through the local file manager on your Chromebook with this extension. The catch is, your Chromebook needs to be running the beta or dev versions. Which, is fairly easy to switch over, even if they are managed by your technology department. If you're not sure what version you are running type this into the Omnibox in chrome; chrome://version. The top line will display the version and build. Here is a sample of mine...This sample is from my laptop running Linux Mint 17.1. However, my Chromebook is also running the dev. version. (the Chromebook is streaming Netflix at the moment.)


To change your chrome channel  follow the directions from Google, listed here. If your Chromebook is managed by the technology department, just ask one of them to change it for you, there should be no reason to not at least update you to beta.

Final Exam Portfolio's with Google Drive.

As a secondary level educator, it is inevitable that my students will have to take some type of "final exam." Apparently. I am a rare breed in my neck of the woods, as far as viewing this "final" culminating assessment as a way to prove without a doubt that students mastered the content, instead of a massive regurgitation exercise that shows how well students memorize and recall information they're told they need to know. Every year my culminating assessment takes a different flavor. One year it was a lab practicum, one year it was a collection of thought experiments, another year it was a TED-talk like presentation...this year there will be three parts to the assessment. First,  I plan to use Google Drive and Google Classroom for students to "host" a portfolio of work that can serve as evidence to prove mastery of specific content. The portfolio will include various reflective prompts that will require students to dig deep into their inner learning and rate their own mastery of the content.  The second part of the exam will challenge students to access their inner Earth Science STEAM brains to create a solution to a local Earth Science themed problem using limited resources. The third part will require students to peer review their work. How will all this work you ask? Let's start with the portfolio.

The First Part: Host a portfolio on Google drive.

Students will be required to select appropriate documents, that meet specific criteria to serve as evidence for their learning. They will be expected to organize a domain public folder with a document that defends their evidence as proof for their understanding. Students will also have the bonus option to customize a generic index.html file that can be edited using Drive Notepad to serve as a landing page for their work. (A separate standard will be amended to the assessment to rate their mastery if they choose to use HTML)

Part Two: Inner STEAM Challenge

For this section, students will be presented with three local scenario's that are related to Earth Science. They will be required to design and propose a solution to one scenario. The scenarios will be presented in such a way that students have to use Earth Science concepts and scientific thinking to be able to develop a plausible solution. The solution will demonstrate mastery of specific concepts, contain visuals/schematic plans where necessary for appropriate apparatuses, and be presented through formal proposal writing.


Part Three: Peer Review

Grading is a significant part of teaching, but how can we make grading easier? For this assessment, I'm turning to my students to help take the edge off the massive amounts of grading following this assessment. Students will participate in a peer review activity, where they will politely critique portfolio's and STEAM solutions. This peer review won't be the end all be all of arriving at a grade, however, it will significantly help me streamline my efforts. This peer review session will use the grading rubrics, retrofitted into a Google form to quickly gather student data that I can use as reference while I review students' work.


With the help of Google Drive, Google Forms, and Google Classroom my students will be presented with a unique culminating assessment that will prove the opportunity for them to prove their understanding on multiple levels.