Showing posts with label Google Apps. Show all posts

Friday, January 29, 2016

OK Google! Why do students struggle to find good information?


My generation was lucky enough to evolve with emerging technology. Thankfully, the technology did evolve. I remember having a rotary phone as the main house land line, watching the original Star Wars Trilogy on Betamax, playing video games like clowns and balloons on the Radio Shack TRS-80 color computer. (It must have been the model 4, I'm not that old) Eventually, the NES came along and our first, true home computer was fully loaded with Windows 95 that had to start from the DOS prompt for some reason. Social media was using EFNet IRC to slowly type a few words like "Hey. What's up?" However, before you got to the internet you were subjected to listening to horrible modem sounds and waiting for the dial up connection. Internet research began with Asking Jeeves about it's sexual orientation as well as how cool other classmates might be.

Now, fast forward about 25 years and thankfully, technology has become more sophisticated and easier to use. In that time, my lucky generation has become masters at asking Google questions and finding relevant information to satisfy the instantaneous need to know how much money Indiana Jones and the Temple of Doom made on opening day, or trying to find the episode of Full House where DJ was caught with a beer by Uncle Jesse. Besides finding useless information, my lucky generation has also become "Google Ninja's" and can pretty much find valid information about any topic, and be able to learn enough about it to be able to show off the newly discovered knowledge. If you need a research paper, Google Scholar to the rescue. If you need specific information about a political issue in the last few months, Google Filters to the rescue. If you prefer to not be tracked and get faster answers that are from more trustworthy sites, then DuckDuckGo is the place to be. Similarly, we've evolved to be able to quickly type the Boolean lingo that we know the search engines want. If I want information about Carbon Dioxide levels from the previous ice age, and  not collect that from Yahoo Answers,  I can search for this in google:  CO2 and Ice Ages -site:answers.yahoo.com

OK, so what's the point of all this rambling, besides a journey down memory lane? Being in a time where technology is everywhere and information is easy to access, many students still do not know how to access this information. Many teachers, myself included, assume that students just know how to use these search tools, and know how to find the correct information. Similarly, we assume they know what sites to trust and what sites to take with a grain of salt. The reality is, they take it for granted that they have these powerful devices that are wicked good at playing games, and "socializing." Our task as educators is to help students learn how to harness the power of these devices. The first step is to help them learn how to use the internet to find good information. Google has a pretty significant hold on this generation. They have devices, they have tools in the cloud, they are taking over education, yet finding valid information can throw a typical student for a loop. My response to this task, as an educator, is to frequently respond to student questions with..."Hmm, that's a great question. I'm not sure, let's look it up." Then I'll model how to search Google for their question.

Google works best if you can summarize your question with short key words. Then, to obtain more relevant information, use the filters to adjust how far back to pull information. Many times I'll include the -site:answers.yahoo.com tag. Students are often told to stay clear of Wikipedia. My philosophy on that differs, Wikipedia is a great place to get some quick information. However, some other sites are not quite as trustworthy. I will typically  model the tag to show students how to eliminate sites that are not always trustworthy, like yahoo answers. Modeling this frequently has helped students hone in on their skills. Similarly, I create assignments that require farther research that encourage students to search Google for information. While students are overwhelmed with a sea of technology, mastering a basic skill provides students with a powerful tool to be lifelong learners.

Wednesday, December 9, 2015

Sign in, Sign Out on a pseudo-Droid? (Not BB-8)

Most schools have a policy that requires students to sign in and out of a classroom if they request to leave the room during class time or arrive late to class. similarly, most computer labs have a sign in and out book of some kind. 

Recently, my school Tech support person approached me about some very old Asus Netbooks that were really good at collecting dust and keeping papers from bowing away. I was asked if I had any use for them. Being the tech hoarder that I am, I immediately jumped on this opportunity and took as many as I could. Why would anyone want an Asus Eee PC seashell series Netbook you ask? Well, the intel atom process is perfect for running Android. That's right, Android. I grabbed up those paper weights, and put some of students on the task of cleaning them up, and creating one solid tweaked out Netbook. We downloaded a pre-compiled x86 branch of Android from the android-x86 project hosted on Sourceforge. We installed the operating system, and just like that, this paper weight was a newly rooted Android tablet. 

Why would we do this you ask? Well, I was getting annoyed with having to continuously clean up the fake names and doodles on my sign in/sign out book in my classroom. I was also annoyed with the occasional interruption in the middle of class because the pen or pencil was missing from the book. I decided to use this device to house a google form as my classroom log. This has helped to eliminated the fake names, times, and most of the fake reasons for leaving or arriving. I also haven't had to replace the writing implement yet! 

The device is a nice piece of equipment to leave near the door. I don't  really care if anything were to break. Similarly, if a student were to try and take it, the battery won't stay charged for very long, and being a pseudo Android, it only works if you have wifi. The device can't make calls, or use data. Since it is rooted device, I easily password protected all apps. A student wouldn't get very far. Unless they could hack my 5 sentence password. (shoot now they now it's 5 sentences. It still won't matter.) 

Here is my routine with the device:
  1. First I made a Google Form to mimic my sign in sheet. 
  2. I have the form set to require users to log in. 
  3. I also made a fake google user in our domain to remain signed into the form during the day. 
  4. On the android device, I made this form the start page for Chrome. 
  5. In the morning, I unplug the device from the charger, sign in as the "science" user on the form and place it on the desk by the door. 
  6. When a student leaves they sign out. When they return, they sign back in.
  7. The form is also available to all students if they want to use their own device, however they have to log in with their Google Apps account to access the form. 
  8. At the end of the day, I shut off the device and put it on the charger. Typically the machine has been holding a charge throughout the day. The Android spends most of the day in sleep mode anyway. (The Android is also set to wake without a password. Upon waking up, it starts in Chrome) 
Really, any device would work. All I'm doing is accessing a google form. I felt this was a good use of a piece of equipment that was heading for the landfill. It was also fun to turn this thing into an Android. 

Saturday, November 28, 2015

Goobric and Doctopus in Classroom

It has been a while since I posted about technology. I took a well needed break from writing as well as from technology. A little tech detox was refreshing.
Since this is my first post in a while, I'll keep it short and sweet. I've been travelling around teaching teachers about the very basics of Goobric and Doctopus combined with Google Classroom. This is a very, very short introduction. However, it is  enough to get you going.

Enjoy.


Tuesday, September 1, 2015

Google Keep vs Evernote...

Which do you prefer, Google Keep or Evernote? I'm switching to Google Keep. My hand writing is horrible, and as a result, I use a digital teacher planner. Recently I have been using Evernote as my planner. The interface is friendly, it can organize my notes into "binders," I can find old notes and edit notes to add class reflections. It seemed to work. However, I recently swapped to Google Keep, accidentally. For some reason, the digital world was in one of those moods where all tech was out to get me. The password I thought I had been using for Evernote, suddenly decided to not work anymore. Out of annoyance and a in a pinch for time, I didn't feel like going through the embarrassment of admitting to Evernote that I forgot my password. So, I quickly turned to Keep on my Android and got my planning done.  Now I'm hooked on Keep.  It's not quite as fancy as Evernote, with binders and a fancy sliding interface. But, I am finding that I like Google Keep more than Evernote. Here are 3 reasons why I am making the permanent switch to Keep.

  1. Google Keep creates easy checkboxes that I can project as my class agenda, and check them off as students finish a task. It makes that stagnant whiteboard agenda more engaging and shows the students that we are accomplishing tasks and moving forward. Putting that check there is just a really good feeling. 
  2. Google Keep allows me to copy my notes to Google Drive. In Eevernote I would organize binders to be able to refer back to notes and lesson reflections quite often. With Keep, I can do the same organization, but it all happens in my drive. I use Google Apps obsessively with students, so one stop shopping is very nice. 
  3. The Google Keep interface is wicked simple. I mean, wicked simple. You add a note, you have a few editing options, and it stays there. There are really no major distracting bells and whistles with Keep. It does exactly what it says it does; "Hang on to every thought and find it right when you need it." I can make a note, find it very quickly, and edit it from any device, throw it into Google Drive, and archive notes for later.  
In my transition to Keep I decided to keep the interface very clean, archive notes, and copy everything to drive. I try to keep no more than 5 notes at a time on the screen. I want it to be simple, and easy to find what I need.  Just my like my Linux desktop, clean and simple.

Where do you stand, Google Keep or Evernote

Sunday, July 12, 2015

Google Classroom Assignments to Calendar


     I stumbled across a very cool article today. It has great directions for creating your own script to sync Google Classroom with Google Calendar. Now, I'll be honest, I looked at the article and went...holy $**t that's a lot of work for a simple task. Then I asked myself, "is it really worth the effort?" I'm not lazy, but I don't want to take a lot of time setting up something that needs a lot of maintenance and tweaking. However, this article got me thinking. If someone has already written a script to do this, it is just a matter of time before Google adopts it and includes it right into classroom for those of us who have other things that require attention. I mean, Google Classroom spawned from Doctopus, eventually they will add this feature.

 But, if you are in dire need of being able to sync Calendar to Classroom, follow the tutorial here and you'll be happy.


Tuesday, April 21, 2015

Multiple Teachers in Google Classroom.

 Google finally added the option to add multiple teachers in Google Classroom. Here is how.

  1. Log into you classroom
  2.  Click About.
  3. Click "Invite Teachers"
  4. Select the teachers to invite and viola. Just like that you have multiple teachers able to post assignments, grade, share resources and do all the good classroom things. 


Add caption

Monday, March 23, 2015

Really "flipping" the classroom.

Technology use in schools has been a buzz word since I became a teacher eight years ago. At that time I wasn't sure why it was such a "new" idea. I mean, I left a career in science that was flooded with technology. It was second nature to use various tech tools on a daily basis. However, most of these tools were presented in such a way where we had to use them to "create" a solution. It seems that technology in schools has become a little stuck.

I recently read a post from Vicki Davis that reminded me that technology is more than a substitute for paper, books, and pencils. I took a moment to reflect on my own teaching to find areas where technology is a substitute and where it is used to create. As I was reflecting, I realized something; there are places where technology is a substitute and it is OK. Like using Google Docs, or Slides, or digital media. But, more importantly I realized that my classroom really is "flipped." Not in the sense that flipped is used in educational technology, but flipped in the Constructivist sense. Somehow I've been able to evolve my classroom into an environment where students are comfortable to direct their own learning and reflect on the process to realize what knowledge they gained from those experiences. As the teacher, I  guide them toward opportunities to engage with the content, but the project based, problem solving that occurs  grasps the idea of using technology to create, as Vicki Davis describes.
borrowed from Pixabay

I am looking forward to school tomorrow for many reasons;

  At the end of one class a  student showed me the amazing website she built for a virtual project tour. I am excited to see the creativity of the rest of the class.

Another student shared a great idea where students will use their understanding of various Earth systems to design a Utopian Solar System to support carbon based life.

Another class has been tinkering with robotics and the use of robots for space exploration. The end of the unit arrived with some audible disappointment. However, a student shared one more idea for  project that will use robotics for another Astronomy concept.

Planning for the next project was completed by my students. The technology that will be used to engage in learning activities was also driven by them. My role is to outline the project to ensure these ideas align with the curriculum by creating appropriate assessments framed by the Next Generation Science Standards and Common Core State Standards. I also need to provide access to appropriate technology tools.  "Flipping the classroom" is more than giving the students a technology tool to complete classwork at home...in other words; providing a tool to do different kind of homework. It is more of letting go of the "Sage on The Stage" mentality, listening to students, and using their ideas. Students are creative individuals and their creativity should be encouraged to help direct the learning of the entire classroom.

Monday, March 9, 2015

Google Docs Image Edits

There are occasions when you need to include an image to a Google doc and you might have to insert arrows, highlights, or edit the image to fit your needs.  Here is how to insert any image into a Google doc to allow you to include these minor adjustments.
  1. Create your Google Doc. 
  2. Insert a "Drawing"
  3. In the Drawing window click "Insert"
  4. Select "Image"
  5. Grab the image you need from wherever it is located. 
  6. Make the adjustments you want. 
  7. Click save and close
The image will be inserted into your Google doc at your cursor. 


Thursday, March 5, 2015

How to quickly enable/disable the Confidentiality Notice in gmail.

Most teachers should have a notice like this attached to their emails...

CONFIDENTIALITY NOTICE:

This e-mail message, including any attachments, is intended for the sole
use of the intended recipient(s) to whom it is addressed and may contain information that is legally privileged, confidential and exempt from disclosure under applicable law. If you are not the intended recipient, you are hereby notified that any disclosure, copying, distribution, use and or taking any action on reliance on the contents of this electronic mail message, confidential information is strictly prohibited (Fed Reg 42CFR, part 2). If you have received this e-mail in error, please notify us immediately or arrange for return of the original electronic mail transmission.
-- 

This essentially adds a layer of protection to you with your parent/guardian correspondence. It reminds the recipient that the conversation is confidential and shouldn't be shared with anyone outside of the immediate concern.

Adding this to gmail is easy. Typically, users will add it as part of their signature.  However, there are times when you may not need to have this notice, like if you are corresponding internally to colleagues with just a quick note like "The team meeting today is canceled." You don't necessarily need the notice with this type of message.

Here is how you can quickly turn this on and off in gmail, as needed.

1) Log into your gmail.
2) Click the gear icon and select settings.
3) Navigate to labs and enable "canned responses"
4) Save your changes, gmail will reload.
5) Compose a new message. You can leave the To: and Subject: lines blank.
6) Insert you confidentiality notice into the body of the email.
7) Click the little down arrow next to the trash can, and select "canned responses."
8) Select "new canned response"  give it a name like "confidential" then hit ok.
9) Now when you are typing an email that warrants the notice, simply hit the arrow again
10) Select canned response and insert the one you just made.

This will allow you to quickly enable the notice as needed, depending on the nature of the email.


Monday, March 2, 2015

Chrome Distill Option

Chrome seems to be one of the popular browsers for education...(in due time Opera will take over, but that's just my opinion). Chrome is packed full with extensions, add-ons, security, speed...etc. All the features you'd want in a browser. One of my favorite add-ons for education has been Clearly. This is a nice simple tool that allows you to distill the page to leave you with simple text, and quickly export the information to your Evernote account, if you choose.

However, Chrome has made the distill process much simpler...sort-of.  It is embedded into the browser. There is a tiny trick to turn it on, but once you do, it invokes the cleanliness of Clearly right in the browser, without any add-ons. However, you won't have the options that Clearly offers, but you still can access the native distill option for clean reading. Here is how.

1) Regardless of your OS, find your Chrome launcher.
2) Navigate to the properties of that launcher, typically a "right-click" will bring up a menu to find properties.
3) in the "target" box or "launch Command" add this at the end
--enable-dom-distiller

Here is a screen shot of mine (Note, i'm running Linux and using Cairo-Dock as my launcher so the screen is going to look different)

the full command for me is
google-chrome-unstable --enable-dom-distiller

In windows, when you right click the launcher and select properties, a window will pop up. In the text box called "target" add this after the last quotation mark
--enable-dom-distiller

Once chrome starts, when you click on the menu icon...you know those three little bars in the upper right, you will now have an option that says
Distill Page


Select this option when you are on a news article, or a website that you want to read without the distraction of ads, sidebars, other posts...etc. Again, all this does is exactly what Clearly.does, without the bells and whistles, and without installing any third party tools.

(on a side note: The color of the screen-shots are a result of my desktop set up. I use all dark colors for all applications, and tools on my laptop. This is mainly for two reasons. First it saves battery life...big time. You may have a different opinion, but when I use the default settings of black on white,  my battery drops significantly fast.  Second; it reduces eye strain. The light on dark is easier on the eye, especially when reading at night, or reading for extended periods of time. Try it on your kindle or nook, you can read way longer!  Third; it just looks good)

Sunday, January 18, 2015

Archive Classes in Google Classroom

Those of us who are secondary educators on a block schedule, are wrapping up the first semester...but, what do we do with all those Google Classrooms we made, and what do we do with the student work? Most teachers are "student work hoarders." Meaning that, we like to save everything we've done with a class, for various reasons. Sometimes, you have great student work you'd like to reference later, or sometimes you have an amazing assignment that you'd like to reuse, for whatever reason, we often save everything. Usually, to the point where all our file cabinets are overflowing. With the help of Google we are reducing our paper trail, yet we still want to save our work. So here is how to Archive your old Google Classroom page.

1) Log into Google Classroom
2) On your "Home" page, locate the classroom you want to archive.
3) Click the three dots in the right-hand corner of the classroom and select archive.


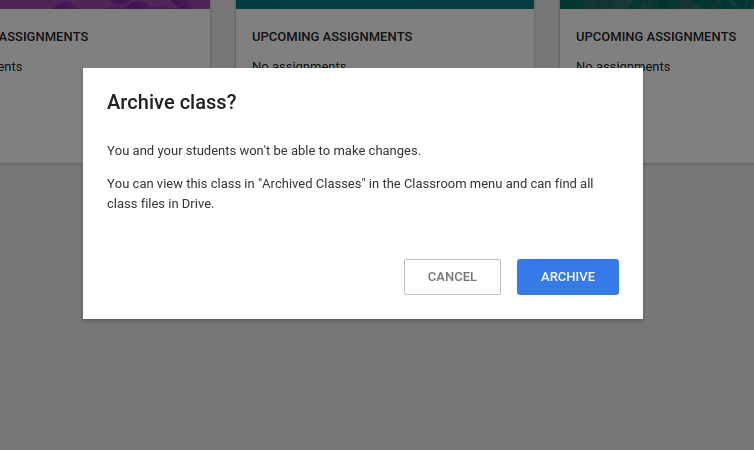
4) You'll see this "warning." Select "ARCHIVE"


Once archived, you'll have a new menu option nestled under "home" called "Archived Classes."
You will still be able to see the classroom, and access student work, however, "you won't be able to make changes."  (Hence the warning that pops up.)


Once you open the archived class, you can still view everything, and there are options to restore the classroom if you need to make changes.


Saturday, January 10, 2015

Search Ted Talks from Chromebook File Manager

Since my last post was a novel, here is a nice quick and easy tip.

You can peruse Ted Talks through the local file manager on your Chromebook with this extension. The catch is, your Chromebook needs to be running the beta or dev versions. Which, is fairly easy to switch over, even if they are managed by your technology department. If you're not sure what version you are running type this into the Omnibox in chrome; chrome://version. The top line will display the version and build. Here is a sample of mine...This sample is from my laptop running Linux Mint 17.1. However, my Chromebook is also running the dev. version. (the Chromebook is streaming Netflix at the moment.)


To change your chrome channel  follow the directions from Google, listed here. If your Chromebook is managed by the technology department, just ask one of them to change it for you, there should be no reason to not at least update you to beta.

Saturday, September 27, 2014

Google Classroom with Co-Teachers

Google classroom is a great tool with so many useful features. However, there is one tiny flaw; currently there is no easy way to build a classroom with multiple teachers. The tool only allows for one user to be the "teacher" or administrator to invite students, create assignments, grade assignments, view submissions, return submissions...etc. Which presents a problem if there are co-teaching scenarios, or if you are using the classroom for PLC's or other purposes where multiple teachers would be helpful.

Here are two possible workarounds. 

1) Share the classroom folder from Google Drive with the other teacher as an editor. The other person may not be able to access Classroom as a teacher, but they would be able to see and edit student work when "turned in." 

2) Use a shared or generic Google account in the domain. There is bound to be at least one test user, if not, I'm sure the administrators would be willing to create one for this purpose. This would allow both teachers to sign in, and assume the role of the teacher simultaneously. 

For now, these are two helpful options until Google addresses recent feedback and makes adjustments to this powerful tool. 

One thing we can do to help get this feature added is to use the "send feedback" option at the bottom of the tool. The more of us who point out the missing feature, the more likely it is to get fixed.


If you haven't used Google Classroom yet, take some time and build a classroom for you students. You will appreciate the simplicity and ease of use, and your students will appreciate how the classroom streamlines the collaboration process. Do not hesitate to send feedback, it will only help make the tool better. 

Wednesday, September 10, 2014

How to merge cells in a Google Doc.

Occasionally there is a need to insert a table in a Google Doc. There is a nice easy "insert" option for a simple table. Sometimes, you have the need to be a bit fancy with those tables and want to do things like merge cells and wrap text...etc. Here is where you start bad mouthing Google Docs. In Google Docs defense, Google Sheets is built to do fancy table work and spreadsheet things. However, there is still the occasion where you need a small table with merged cells, so how do you get that to work in Docs?

It's a bit of a round-about way, but it works like a charm.

1) Make your document that requires the Merged Cells table.

2) Make a new Google Drawing. Not just insert a drawing, but create a new Google Drawing from your drive "New" list.

Why a new drawing? The insert option in the doc has limited features, but if you make an entire new "drawing" you have access to more tools and flexibilty.


3) Once you have a new drawing, name the file, and Insert a table.

4) From there you can "right-click" to gain more options, just like you might be familiar with in other word processing programs.

5) Here is the trick. When your table is done or good enough, copy the table from the drawing

6) Once it is copied (use ctrl+c), navigate back to your Doc, and click Insert>Drawing to paste your copied table in the window. Use ctrl+v to paste your "drawing" in the pop-out window.

There you go, you now have a table with merged cells in your doc. If you need to edit the table, you can now use the in doc edit features and still have access to the table options.


Tuesday, September 2, 2014

Assingments In Classroom For Google

As I am becoming more comfortable with this tool, and my students are really enjoying the streamline organization of sharing and submitting documents. Here is a quick tip to share the same assignment with multiple classrooms, in Classroom for Google. It is very intuitive, but sometimes what is right in front of our faces remains hidden.

Here's how to share the same assignment across multiple Google Classrooms.

1) Log into one of your classes and organize your "assignment"


2) Once your assignment is set, click the down arrow in the middle of the assignment box as shown above.


3) Check the boxes for the other classes who require the same assignment.


4) Select assign. 


It really is that easy. 


Sunday, August 31, 2014

How to "Reset" Your Google Calendar

Recently, a few colleagues ran into a snag with their google calendar. Their "primary" calendar was being used as to post homework assignments to students. What ended up happening was that this primary calendar, the first calendar they made, was also being accessed by other faculty in the domain to schedule appointments and events. Which became an issue since many confidential meetings are scheduled through the use of calendar. If a teacher responded to an invite, then this meeting would show on the student homework calendar! Which raises a HUGE red flag. So the issue was something along the lines of...How do I change my primary calendar instead of changing the viewing options for each event? 
 The simple answer is...you can't change your primary calendar. (well not easily)
So then, where is the reset button on my google calendar? and How do I reset it, but save all my data at the same time?

If you fall into the category of needing to "reset" your calendar for any reason, here are a few steps to restore everything back to default, and at the same time have the option to restore your data.
  • The short and simple explanation is to export your old and import it into a new. Should be as simple as clicking like 14 times...(key word is  "should be")

Here is is a more detailed explanation:


1) log into your calendar
2) on the left where it lists all your calendars...click the little down arrow


 3) Select "settings"

4) You will be sent to another page that looks something like this...
 5) Scroll down, and at the bottom of the "My Calendars" section you'll see an Import and Export option


​​6) Check the boxes next to all the calendars you care about and want to backup. This is important. If you don't save them, when you reset your calendar they will all disappear. When you are sure you have all that you want/need click the export calendars option. 

7) You will get a .zip  of you calendar data.

8) Then delete everything off your personal calendar. There are two options. 1) manually delete each event or delete your entire calendar and start from scratch. Ideally you exported all your data and have a nice archive of data as a backup, so it should be safe to reset back to the default calendar. In other words, start over as it was the first day you logged into google calendar.
9) To delete your calendar the easy way, under settings again...
click the primary calendar (should be the first on the list), scroll down and hit Delete. You will be prompted with a few warnings, and safety checks to make sure that is really what you want to do. You made a backup of everything so it should be save. This will reset you back to the google default calendar. You'll lose all labs, secondary calendars...etc. For example, my primary calendar is called "Michael Norkun" If I delete that one, it will delete all other calendars in the "my calendar" list, as well as all the calendar labs  I have enabled.

10) Now that you have a clean slate, keep your primary calendar for personal use only. Then make a calendar for every other thing you want. From there you can import the  backup you made. If your backup consisted of multiple calendars, within the .zip file you will see a series of different calendars. Select the import option in Google Calendar, and find the backup you want to restore and simply select what new calendar you want the data to go too.


This is just a quick and easy way to reset your entire calendar and start from scratch. Before you delete any calendars, make sure you have them backed up. That is my only word of caution. 

Sunday, August 24, 2014

Classroom for Google Tips

As the school year rapidly approaches, I have created classrooms within Classroom for Google. My goal is to be 100% paperless this year. As I tweak the classrooms here are a few short tips for features to use, as this new tool increases in popularity.

Use the About Page. 

  At first glance of Classroom for Google, you'll notice it has a very sleek, clean, and simple interface. Which is exactly what teachers and students want. The about page is a great place to store all those things like a course syllabus/description, copies of school documents, field trip forms, classroom homework/announcement calendars, helpful links, links to the eBooks your classes will use, and links to your classroom lesson podcast.

Change the Theme


  There are limited theme options at the moment, but based off the new menu that appears when you click on the option, it looks as though more options will soon be added. However, I would suggest changing the theme to allow for easier course identification from your home screen, and provide a nice visual for you students. Make it welcoming.


Virtual Discussions

   Use the announcement page to hold virtual discussions. Add a prompt and let students respond to each other and interact as a homework assignment.

Increase Collaboration and Creativity

  When creating an assignment for students, think outside of the box. Instead of simply sharing the directions typed in a Google doc, share a document, presentation, or spreadsheet where students are assigned to edit and collaborate on specific pieces of the same document to arrive at one larger final product.


Classroom for Google offers some unique ways to expand the classroom beyond the four walls, and create a much more tight-knit group of individuals all working together to help each other learn.


Tuesday, August 19, 2014

Google Calendar in Classroom For Google

Classroom for Google is a fantastic tool. If you have Google Apps For Education and haven't tried the tool yet, head on over and make a classroom. It is very clean and user friendly. I had a few colleagues ask me today, How can I get my homework calendar onto my Classroom For Google page? Here is a simple way to include a homework calendar/agenda/or any other variation of Google Calendar to your classroom page.

1) Make sure you have a classroom set up.
2) In your classroom click on the "About" section.
3) If you haven't done so yet, add in some information about the course, then at the bottom there is a space for resources.
4) Head to your Google Calendar for your Homework/agenda/etc... and grab the public link.
5) Paste the link in the materials sections and students will now have streamline access to their work.


How do you get the public link from your Google calendar?

1) Go to Google Calendar
2) Find the appropriate Calendar in your list on the left hand side of the screen.
3) Go into the "Calendar Settings"
4) Find the section called "Calendar Address"
5) Copy the address and paste it into your materials list in Google classroom.

Here is a short video tutorial.

Wednesday, August 13, 2014

Google Calendar

Have you ever needed to share your calendar with more than a few people, but felt like it would take way to long to type in every individuals name? Have you noticed, you can't share directly with a contact group? Here is a quick work around.


1)    Open your Google Calendar.


2)     Locate the calendar name you want to share on the left hand side of your list.


3)    Click "Calendar Settings"


4)     On this page find the item called "Private Address"


6)     Grab the format you prefer.


7)     Head over to Gmail, and mail it off to your contact group.


Note: Using this link will only allow the people you share it with to see the event details in a news feed reader, they will not be able to edit, or create events. They will not see it in their calendar lists. This method only lets you get the calendar out to people privately so they can view it from a news reader. 

Thursday, June 26, 2014

New Google Doc Options

As the Google I/O continues, new Google features are being rolled out. Drive now has a great addition to enhance collaboration. There are now three lenses collaborators can quickly swap between to view a document with a different role. Collaborators with appropriate permissions can swap between an editor, viewer, and a new role that allows you to make suggestions. 

This new role essentially integrates the comments much more intuitively and color codes changes in real-time. For example, if a student were editing a document, and the teacher wanted to provide some feedback. The teacher could choose the role of "suggestion" and type in a suggestion while the student is making edits. On the student end of the document,  a pink highlight will appear in the text, with a new comment added, as well as a place holder in the document with the suggestion. If the suggestion is to change a portion of the document, the teacher can actually cross out a portion of the document, but the editor can see the changes being crossed out with the original material still present. If the student doesn't want to take the advice, they can close the comment box and the suggestion clears for both collaborators. 

This opens some great opportunities for teachers to collaborate with students to provide more real-time feedback and provides easier tools for the student to incorporate these suggestions into the document, without interrupting the flow of the editing process. Similarly, this opens more opportunities for better peer editing. Students can actually collaborate and see changes and suggestions without losing the original thoughts and ideas, to acquire one truly collaborative document. 


This image shows the new menu options. 


This image shows what the "Suggesting" role looks like. 


Here is what the "editor" role looks like.